


Getting to Know Adobe Premiere Pro
- SCREEN GOAT
- Sep 13, 2022
- 4 min read

Updated: May 21, 2023
Let's Make a Garbage Edit.
We will go through the basic menus, panels, effects and controls to get you started as an editor. My goal is to begin preparing you to be an editor and to get you Adobe Premiere Pro Certification ready.

I love to introduce people to editing with a low pressure "Garbage Edit".
The purpose is to explore Adobe Premiere Pro with no pressure.
We are going to take a look at important elements, and put some footage on your timeline to make a Garbage Edit. This gets in some great practice navigating the program.
Here are the things we will explore:
1. The Interface:

Project Panel Double click to import
Note: at the bottom of this panel folded paper is NEW ITEM.
Source Monitor You can mark Ins an Outs
Effects Controls Position, Scale, Rotation, Opacity and Key Framing
Program Monitor This is where you see what is on your timeline.
Note: If you drag a clip from the preview panel on top of this panel you
will get a visual editing menu.
Timeline This is where you build your editing sequence, to expand your clip
view to see thumbnails, double click in the open space in the
beginning of the track. This is also where you can Lock and Mute clips.
Playhead The Playhead is the blue line. It shows you where you are in time in
every panel.
Interface Menus Tools Importing Footage Effects Controls Audio Effects - Audio & Video Titles Exporting Adobe
2. Menus:


Preferences Auto-Save, Audio Hardware, Sequence Settings
Sequence Sequence Settings (When you pull a new clip on the timeline and you
are asked if you want to CHANGE or KEEP the sequence settings. I
usually select CHANGE to match my clip. BUT, if you get the wrong one,
and the aspect ratio is not what you would like change it under
Sequence Settings.
Window If your windows gets messed. Under Window > Workspace > Reset to
Editing Basic Editing Window - I think of this as Home Base.
Color Basic Color Correction, Creative meaning color grading
Audio Decibels (Dbs), Volume, Dialogue, Music, Special FX
Graphics Essencial Graphics / Title
Interface Menus Tools Importing Footage Effects Controls Audio Effects - Audio & Video Titles Exporting Adobe
3. The Tools and Short Cuts:

Adobe Premiere Pro Tools - How They Work - Click to Expand
Interface Menus Tools Importing Footage Effects Controls Audio Effects - Audio & Video Titles Exporting Adobe
4. How to Import a Clip in Adobe Premiere Pro

Import some footage and put it on the timeline. Double Clip in your Project Panel to get footage. Then drag the footage to the Timeline.
Tips:
1. Make sure the A1 and V1 tracks are turned on

2. If your Windows or Panels get messed up, goto Window, Workspaces, Reset to Saved Layout

Interface Menus Tools Importing Footage Effects Controls Audio Effects - Audio & Video Titles Exporting Adobe
5. Effects Controls
Motion
Play with the following:
Position - Left and Right / Up and Down
Scale - Size
Rotation - Moving in circular motion
Opacity - Amount of transparency
Then, turn on the Toggle Animation to make Key Frames to put your footage into motion.
Interface Menus Tools Importing Footage Effects Controls Audio Effects - Audio & Video Titles Exporting Adobe
6. Audio/Music
Audio Window
Adding music
Default Transition
Pen Tool
Key Framing Volume
Interface Menus Tools Importing Footage Effects Controls Audio Effects - Audio & Video Titles Exporting Adobe
7. Effects
Video Effects
Blur
Crop
Distort
Ultra Keying
Lightning
Video Transitions
Dissolve / Default
Wipe
Push
Zoom
Iris
Audio Effects
Transitions - Crossfade
Amplify
DeNoise
Key Framing
Audio Transitions
Transitions - Crossfade
Interface Menus Tools Importing Footage Effects Controls Audio Effects - Audio & Video Titles Exporting Adobe
8. Title - Essential Graphics
Scale
Color
Font
Stroke
Alignment
Interface Menus Tools Importing Footage Effects Controls Audio Effects - Audio & Video Titles Exporting Adobe
New Item:
Sequence
Black Video
Color Matte
Adjustment Layer
Interface Menus Tools Importing Footage Effects Controls Audio Effects - Audio & Video Titles Exporting Adobe
9. How to Export
Follow these steps to export your videos from Premiere Pro:
1. First Click File, go down to "Export" and then click "Media..."

2. Select format H.264, and preset YouTube 1080p Full HD.

3. Select Output Name to make sure you know the location of your exported video!
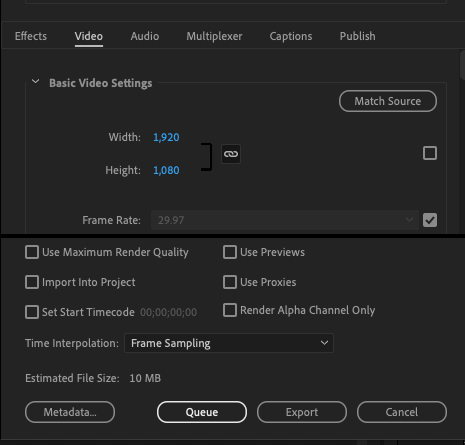
4. Then, Click Export! Only select Queue for Media Encoder export.
5. Wait for video to finish.
Interface Menus Tools Importing Footage Effects Controls Audio Effects - Audio & Video Titles Exporting Adobe
See you next time on SCREENGOAT.
#EasyEditingTricks #EditingFX #Filmmaker #VideoEffects #MovieEffects #MoviesFX #Editor #Edit #AdobeCertification #AdobePremiereProCertification #Certiport #Effects #Motion #Opacity #Title #Music #NewItem #EffectsControl #HowToImportAClip #ResetWindow #LearnPremiere #HowToEditInPremiere #Certification
You Might Find These Interesting:
Free Production & Blogging Resources:

Copyright © 2022 Screengoat & Round-Circle, Inc.


